sealing

Farnham Travertine Floor Finished

Travertine Tiled Floor Maintenance in Fareham

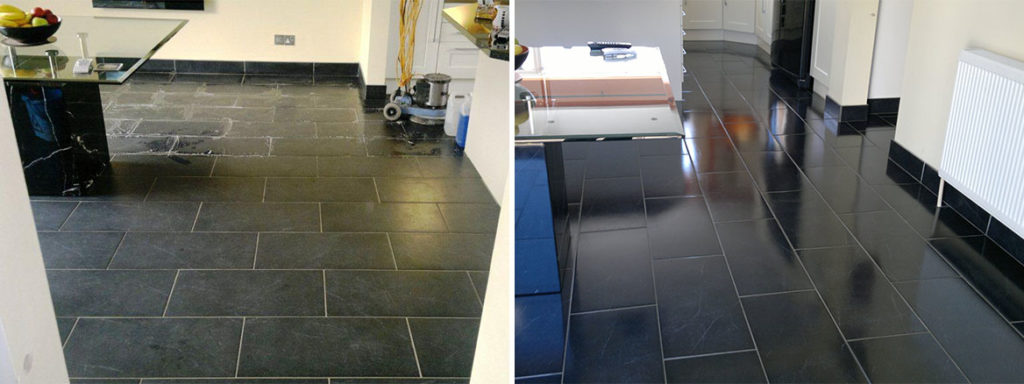
I do like a beautiful Travertine Tiled floor however they do need regular maintenance to keep them looking good. This travertine floor installed in the kitchen of a house in Fareham was no different as the tiles were looking dull and the grout was tarnishing.

Farnham Travertine Floor 1

Cleaning Travertine Kitchen Tiles

To protect the kitchen units from water a protective tape was applied around the base and once done we gave the tiles a quick clean using Tile Doctor Pro-Clean working it in with a scrubbing pad fitted to a rotary machine and then into the grout lines with a stiff hand brush. The dirty solution was then removed using a wet vacuum and we moved onto burnishing the whole tiled floor.

Farnham Travertine Floor Cleaning in Progress
We stated the burnishing process with a red fitted to a rotary machine with a little water. The burnishing pads are encrusted with diamonds and are very good at removing dirt and sealers from hard stone including Travertine and Marble; the surface water and loose dirt was removed used a wet Vacuum. There are four pads in the burnishing system and they are applied to the stone floor in sequence starting with a course pad with a little water and then moving onto the finer polishing pads one after the other until we were left with a high shine finish.

Farnham Travertine Floor Finished 3

Sealing Travertine Tiled Floor

We left the floor to dry overnight and came back the next day to seal the floor. The floor must be dry before sealing otherwise the results can be unpredictable. Once we were happy the floor was dry we proceeded to seal the Travertine tile using two coats of Tile Doctor Colour Ultra-Seal which provides a natural look to the stone as well providing excellent stain protection. Two coats of sealer were sufficient to seal the floor.

Farnham Travertine Floor Finished 4

Travertine Floor Tiles Cleaning and Sealing in Fareham

Travertine Tiled Floor Maintenance in Fareham Read More »

Marble Floor Tile Restoration Winchester Finished

Marble Tiled Floor Restored in Winchester

Photographs below of a classic black and white Marble floor tile installation at premises in the city of Winchester. As you can see these Marble tiles had seen some traffic and were not in the best of condition following on from some building work that had been going on; fortunately we are quite used to dealing with these problem and have just the right products and equipment to restore them.

Marble Floor Tile Restoration Winchester Before

Marble Tile Cleaning and Polishing

For best results on hard stone surfaces such as Marble we burnish the floor using a set of diamond encrusted polishing pads. You start with a coarse pad which applied with a little water to remove surface dirt and sealers etc. before moving through a set of finer polishing pads until you reach a high shine glossy finish.

Half way through the burnishing process we stopped to apply a dilution of Tile Doctor Pro-Clean along the grout lines and give them a scrub with stiff hand brushes repeating the process in stubborn areas.

Marble Floor Tile Restoration Winchester Finished
After the treatment the floor was washed do to remove any soiled solution before being buffed with a white buffing pad. Any trace of its previous condition was now gone and the floor was uniform in appearance, it took much of the day to do the polishing and a set of four burnishing pads to acquire the right lustre.

Marble Floor Tiles restored in Winchester

Marble Tiled Floor Restored in Winchester Read More »

Terracotta Tiled Floor Before and After Cleaning in Andover

Terracotta Tiled Floor Cleaned and Sealed in Andover, Hampshire

This Terracotta tiled floor was installed in the dining room of a house in Andover and as you can see from the photograph below the floor had not been maintained very consistently and was now well overdue for a complete strip, clean and reseal.

Terracotta Tiled Floor Before Cleaning in Andover

Cleaning Terracotta Tile

To get the floor clean and remove previous sealers and coatings I mixed a strong solution of Tile Doctor Pro-Clean with NanoTech UltraClean which basically adds tiny abrasive particles to a heavy duty alkaline cleaning agent to produce a very effective stripper/cleaner which being alkaline is ideal for cleaning natural products such as Terracotta.

This formula was scrubbed into the tile using a black scrubbing pad fitted to a rotary machine running on a slow speed which helps to reduce splashing; this activity soon brought the dirt off the floor and the soiled cleaning solution was removed using a wet vacuum and the floor was rinsed down with clean water. The cleaning process was repeated a couple of times until we were happy with the floor, a stiff hand brush was then used along the grout lines with more Pro-Clean to clean up the grout. There were a few stubborn paint splashes on the floor and these were removed by spotting the affected area with Remove and Go and a steamer to lift the stain out of the clay.
Once happy the floor was clean it was given a thorough rinse to neutralise it and remove any remaining chemical and left it to dry overnight.

Terracotta Tiled Floor Before Cleaning in Andover

Sealing Terracotta Tile

The next day we came back to seal the Terracotta using numerous coats of Tile Doctor Seal and Go which is an ideal sealer for Terracotta and provides durable stain protection together with a low sheen finish. Terracotta is by its nature very porous and so it’s not unknown for it to take up to nine coats of sealer, which can take some time to apply as like paint you have to wait until it’s dry before you can apply the next coat.

Terracotta Tiled Floor After Cleaning in Andover
 

Terracotta Floor Cleaned and Sealed in Hampshire

Terracotta Tiled Floor Cleaned and Sealed in Andover, Hampshire Read More »

Kitchen Tiled Worktop in Brighton Before and After Cleaning

Cleaning a Ceramic Tiled Kitchen Worktop in Brighton

Following a referral from customer which is always nice to have, we paid a visit to a house in Brighton where the owner was having difficulty keeping their ceramic tiled kitchen worktop clean. As you can see from the photograph below the glazed ceramic tiles were in reasonable condition, it was the grout that was the problem; this is not unusual as glazer ceramics are very hard wearing but the top layer of grout is in fact porous and will trap dirt and become discoloured if not sealed.

Kitchen Tiled Worktop in Brighton Before Cleaning

Grout Cleaning

There were two ways this job could have been tackled, the first being to remove the top layer or grout using the flat blade of a screwdriver and then re-grout. It was a reasonably large area of worktop so this would have taken some time. The second and simpler option is to use a heavy duty tile and grout cleaning product such as Tile Doctor Pro-Clean and that is exactly what we did, it also has the added advantage of cleaning the tiles at the same time.

The Pro-Clean was diluted with water and then left to dwell on the tile and grout for about ten minutes before being scrubbed in by hand with a stiff brush. For the wall tiles the solution was decanted to a spray bottle and sprayed onto the tiles, the combination with air makes it lighter and more able to stick to a vertical surface.

The tiles were then washed down with water and any stubborn areas re-treated with more Pro-Clean and elbow grease, it wasn’t long before the tile and grout was looking like new again.

Sealing Grout

Now glazed Ceramic tiles don’t need to be sealed as the glaze provides an effective barrier however as I mentioned before the top layer of grout is porous and will attract dirt over time and should be sealed, especially considering kitchen worktops are used to prepare food. Tile Doctor have a range of sealing products any of which will seal grout however in this case I used Wall Tile and Grout Sealer which comes in a spray bottle.

Kitchen Tiled Worktop in Brighton After Cleaning

Cleaning Ceramic Worktop Tile and Grout on the South Coast

Cleaning a Ceramic Tiled Kitchen Worktop in Brighton Read More »

Southampton Slate Tiled Floor Before and After Cleaning

Cleaning Slate Tiles in a Southampton Kitchen

This beautiful slate floor installed in the Kitchen of a house in Southampton had tons of character but unfortunately years of use had left it looking rather washed out and was overdue for a deep clean and re-seal.

Southampton Slate Tiled Floor before Cleaning

Cleaning Slate Tiled Floors

I set about scrubbing the floor using a hot water dilution of Tile Doctor Pro-Clean Tile and Grout cleaner combined 50:50 with NanoTech UltraClean which adds tiny abrasive particles to the solution to make a more effective cleaning product. The solution was left to dwell on the floor for a while before being scrubbed into the tiles with a rotary machine fitted with a black scrubbing pad; a stiff hand brush was used along the grout lines. The soiled solution was removed using a wet vacuum and floor thoroughly rinsed down with clean water. Pro-Clean works as a stripper as well as a cleaner and so any remaining sealer was also removed using this process, had that been a problem I would of resorted to Tile Doctor Remove and Go which is a much stronger coatings remover.

The soiled cleaning solution was removed using a wet vacuum and this was followed by washing down the area thoroughly with clean water; any stubborn marks were revisited with a repeat of the same process until we were happy the tiles were clean.

Sealing Black Slate Floor Tiles

This process took most of the day so we left the floor to dry overnight and came back the next day to seal it using Tile Doctor Seal and Go, a highly recommended sealer for Slate which provides good stain protection with a low sheen finish, slate is quite porous and it took five coats before it was fully sealed.

Southampton Slate Tiled Floor after Cleaning
I think you will agree the floor is transformed, the natural colours of the slate have come through and the low sheen has given the floor a nice health appearance.

Cleaning and Sealing a Slate Kitchen Tiles in Hampshire

Cleaning Slate Tiles in a Southampton Kitchen Read More »

Black Slate Floor Portsmouth Finished

Cleaning Black Slate Tiles in Portsmouth

This was a straightforward black slate tile clean and seal in a large kitchen of a house in Portsmouth, the tile and grout were in good physical condition and just needed of a deep clean.

Black Slate Floor Portsmouth Before Black Slate Floor Portsmouth Before

Cleaning Slate Tiled Floor

The first step was to give the tiles a really good clean using a dilution of Tile Doctor Pro-Clean which was left to dwell on the tile for a while before being scrubbed into the floor using a rotary machine fitted with a black pad. It was a large area so we worked in sections and used a stiff brush along the grout lines to get them clean.

The soiled cleaning solution was removed using a wet vacuum before washing down the area thoroughly with clean water; any stubborn marks were revisited with a repeat of the same process until we were happy the tiles were clean.

Black Slate Floor Portsmouth Cleaning Black Slate Floor Portsmouth Cleaning

Sealing Black Slate Floor Tiles

We left the floor to dry overnight and came back the next day to seal it using Tile Doctor Seal and Go, a highly recommended sealer for Slate which provides good stain protection with a low sheen finish, slate is quite porous and it took five coats before it was fully sealed.

Black Slate Floor Finished Black Slate Floor Finished

The black slate looked amazing when we had finished, the customer was certainly happy with the result.

Cleaning and Sealing a Black Slate Tiled Floor in Hampshire

Cleaning Black Slate Tiles in Portsmouth Read More »

Fareham Terracotta Floor Finished

Terracotta Tiled Floor Maintained in Fareham, Hampshire

This Terracotta tiled floor was installed in the kitchen of a house in Fareham. The floor was in need of a deep clean especially in the high traffic areas where the sealer had worn down and on the tiles near the kitchen units there were some stubborn stains from spillages.

Fareham Terracotta Floor Before

Cleaning Terracotta Tile

I started the job using a solution of Tile Doctor Pro-Clean, which is a heavy duty alkaline product ideal for cleaning natural products such as Terracotta, this was scrubbed in with a black pad fitted to a rotary machine. The cleaning process was repeated a couple of times and a stiff hand brush was used along the grout lines to clean up the grout. To treat the suborn stains we mixed Pro-Clean 50/50 with Tile Doctor NanoTech UltraClean which adds tiny abrasive particles to the cleaner making it even more effective; its best to leave the resultant solution to soak into the tile for half an hour before working it in with a scrubbing brush. Once happy the floor was clean it was given a thorough rinse to remove any remaining chemical and left it to dry overnight.

Fareham Terracotta Floor During

Sealing Terracotta Tile

The next day came back to seal the Terracotta but first checked the floor for any spots we might had missed and also to ensure it had dried sufficiently. Tile Doctor Seal and Go was used to seal the floor, it’s a water based sealer so it doesn’t give off an odour when it’s drying and also offers durable stain protection together with a low sheen finish. Terracotta is very porous and in the end the floor actually took seven coats of sealant before it was fully sealed. Applying a sealer does takes a long time to apply as you have to wait for it to dry before applying the next coat.

Fareham Terracotta Floor Finished
The work took two days in all and you can see the difference for yourself, the Terracotta tile and grout look wonderful and have lifted the overall look of the Kitchen.

Terracotta Floor Cleaned and Sealed in Fareham

Terracotta Tiled Floor Maintained in Fareham, Hampshire Read More »

Fareham Quarry Tiled Floor Finished

Quarry Tile Restoration in Fareham

Details below of a Quarry Tiled kitchen floor that were cleaned and sealed for a customer in Fareham. The main problems were that the tiles were becoming increasingly difficult to clean so they looked dull and tired and the grout had become stained.

Cleaning Kitchen Quarry Tiles

A solution of Tile Doctor Pro-Clean was applied to the floor and left to soak for a short while before being scrubbed in with a rotary machine fitted with a black scrubbing pad. The grout was also in need of attention and this had to be scrubbed by hand using a stiff brush along the grout lines, which as you can imagine took some time. The soiled cleaning solution was then removed using a wet vacuum and the floor thoroughly rinsed with water and then left to dry overnight.

Fareham Quarry Tiled Floor Begin Fareham Quarry Tiled Floor Begin

Sealing Kitchen Quarry Tiles

When we returned the next day we could see there were a few areas in need of some further attention so we set about cleaning those up. Once we were happy with the floor and it had managed to dry off we sealed the floor using six coats of Tile Doctor Seal and Go which is a water based sealer (so no smell) that provides surface stain protection to the quarry tile and grout and also leaves a nice deep low sheen on the tile surface.

Fareham Quarry Tiled Floor Finished Fareham Quarry Tiled Floor Finished


Quarry Tile Cleaning in Hampshire

Quarry Tile Restoration in Fareham Read More »

Slate Floor Fareham Finished

Cleaning & Sealing Slate Flagstone Tiles in Fareham

These Slate flagstone tile were installed in a conservatory in the town of Fareham. The flagstones and grout were reasonably clean and in good condition but the previous sealer had all but worn off and they were looking dull and in need of revamp.

Slate Floor Fareham Before

Slate Flagstone Cleaning

As the previous sealer had all but worn off I decided not to apply a dedicated coatings remover product such as “Remove and Go” but instead use a strong cleaning solution to remove the remaining sealer and clean the floor in one go. For this I choose a strong dilution of Tile Doctor Pro-Clean mixed with 50/50 with Nanotech Ultra-Clean which adds tiny abrasive particles to the mix. The cleaning solution was applied to the floor with a mop and then left to dwell for 20 minutes before being agitated with a buffing machines fitted with a black Scrubbing pad and stiff brushes along the grout lines.

Slate Floor Fareham Cleaning
The soiled solution was then removed using a wet vacuum and the floor rinsed with clean water and left to dry. We could see at this point that the job was a success and we had successfully managed to clean the floor and remove the sealer in one go.

There was no history of what had been used to seal the floor previously so it’s important to ensure all the old sealer had been completely removed as the old sealer could have been incompatible with the sealer we wished to use and resulted in an unexpected finish.

Sealing the Slate Floor

We sealed the slate flagstones with a single coat of Tile Doctor Colour Grow which really helps bring out the deep colour from within the slate. To finish and build up the lustre and richness of the colour we then applied seven coats of Seal & Go which add a nice low sheen to the surface of the tile.

Slate Floor Fareham Finished
For general cleaning and to get a long life out of the sealer we recommended the use of Tile Doctor Neutral Cleaner, diluted 1:30 with water and applied with a microfibre flat mop, rinse with water and then remove with a clean microfibre flat mop.

Restoring a Slate Flagstone Tiles in Fareham

Cleaning & Sealing Slate Flagstone Tiles in Fareham Read More »

Victorian Tiled Hallway Floor No 21 Finished

Victorian Tiled Hallway Cleaned and Sealing in Portsmouth

This beautiful Victorian tiled hallway was an original period feature at a property in Portsmouth. Some of the tiles had suffered over the years but it was still intact and functional, it was just in need of a deep clean and seal.

Cleaning a Victorian Floor Tiles

We gave the floor a thorough clean using Tile Doctor Pro-Clean mixed 50/50 with Nanotech Ultra-Clean and then diluted with water, this results in a powerful cleaning agent that’s still safe to use on these old floors. This was left to dwell for a while before being worked into the floor using a buffing machine fitted with a black scrubbing pad. Once we were happy with the floor we used a stiff hand brush to get into the grout joints and cleaned those up as well. The last step was to remove the soiled cleaning product using a wet vacuum and then rinse the floor down with water to remove any remaining chemical before sealing, this last step neutralises the floor which is important as leaving a cleaning product on the floor could upset the sealer.

Victorian Tiled Hallway Floor Before

Sealing the Victorian Tiled Floor

The floor was left to dry overnight and we came back the next day to seal. We were happy the floor was sufficiently dry so proceeded to seal it with four coats of Tile Doctor Seal and Go which is ideal for Victorian floor tiles providing a low sheen finish whilst offering excellent stain protection. You do have to leave each coat to dry before applying the next so it can take some time to apply.

Victorian Tiled Hallway Floor Finished
 

Restoring a Victorian Tiled Floor

Victorian Tiled Hallway Cleaned and Sealing in Portsmouth Read More »

Scroll to Top