Terracotta Tile Cleaning

Welcome to my Work History archive where you will find detailed examples of the cleaning and renovation of Terracotta tiles carried out in Hampshire

Cleaning and Renovating Terracotta Tiles

Terracotta tiles have been around in certain parts of the world for over two millennia, in fact the word Terracotta means burned earth. The ancient Romans used a variety of terracotta tiles in their villas and palaces for many centuries. Terracotta tiles are thicker than most modern tiles giving them strength and durability.

The one big downside to Terracotta is the fact that it has no glaze on the surface and being very porous can soon pick up and store muck and dirt very quickly. If you have ever owned a Terracotta floor before you will be able to relate to this problem however the answer is to ensure you have the correct sealer in place.

Traditionally Wax was used to protect terracotta tiles however with the advent of modern purpose made sealers we don’t recommend it. Not only is it troublesome to remove but it scratches easily and we have seen situations in kitchens where dirt and oil trapped in the wax turns black and becomes very unsightly.

For sealing Terracotta we actually recommend Tile Doctor Seal and Go which works well on clay tiles such as Terracotta and is also water based so doesn’t give off a smell as it dries. When applying a sealer always make sure the floor is dry first as applying a sealer to a damp floor can lead to inconsistent results. Because of this we typically clean and seal Terracotta floors over two days so we can clean on day one and then apply the sealer on day two having let the floor dry off overnight.

Below you will find detailed examples of work we have carried out in the past, it should give you some idea of what’s involved and what can be achieved with the right techniques and products.


Terracotta Floor With Efflorescence in Lymington Before and After

Removing Efflorescence From a Terracotta Tiled Floor in Lymington

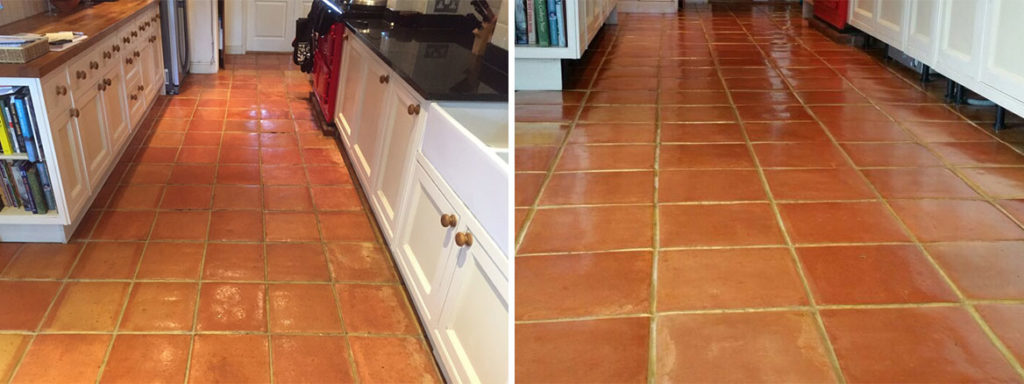
Here’s an interesting job I completed recently in the town of Lymington which is a lovely costal town within the New Forest and on the west side of the Solent. This Terracotta tiled floor was installed in the kitchen and was suffering from an efflorescence issue due to an ongoing leak which resulted in the salts in the water becoming deposited on the surface of the tiles as the water evaporated leaving a white bloom on the surface.

Terracotta Floor With Efflorescence in Lymington Before
This process is more commonly known as efflorescence and is particularly common in old properties which have no damp proof membrane under the floor and white staining by the cupboards is especially visible in the below photograph.

Terracotta Floor With Efflorescence in Lymington Before Enlarged
My client was eager to have the problem fixed, and so enlisted Tile Doctor to get the job done.

Removing Efflorescence from Terracotta

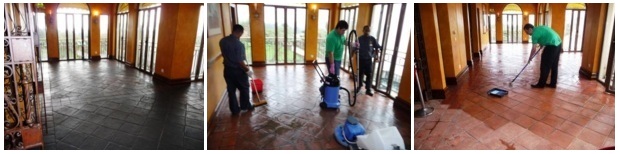
To remove the efflorescence, the Terracotta tiled floor was acid washed using a mild dilution of Tile Doctor Grout Clean-Up which is primarily sold to remove grout smears but is equally effective at removing mineral deposits such as the white salts left behind by efflorescence.

The solution was scrubbed into the tiles using a stiff scrubbing brush and was successful at removing the white staining. Naturally it’s not advised to leave acid too long on any surface so the floor was treated in sections and then rinsed off with water and the residue removed using a wet-vacuum.

Following this, the floor was power-scrubbed in combination with a diluted solution of Tile Doctor Pro-Clean. Pro-Clean is a versatile cleaner that also contains stripping properties, allowing it to break down and remove old sealers, it also does a nice job getting the grout clean.

With the efflorescence treated and the floor now clean I was now happy with the condition of the tiles and give them a final rinse under pressure to ensure the floor was neutralised and any trace of products removed.

Sealing a Terracotta tiled floor

The Terracotta tiled floor was then left to dry overnight and I came back to seal the floor the next day. To seal the tiles I used three coats of Tile Doctor Seal & Go Extra, which provides a robust surface seal, and is recommended for internal floors with the damp issues.

Terracotta Floor With Efflorescence in Lymington After
Hopefully this quick report has offered some useful advice on how to treat efflorescence which is quite a common problem; naturally if you have further questions Tile Doctor does offer a free advice service so do get in touch.

Treating Efflorescence on a Terracotta tiled floor in Hampshire

Removing Efflorescence From a Terracotta Tiled Floor in Lymington Read More »

Terracotta Tiled Floor Before and After Cleaning in Andover

Terracotta Tiled Floor Cleaned and Sealed in Andover, Hampshire

This Terracotta tiled floor was installed in the dining room of a house in Andover and as you can see from the photograph below the floor had not been maintained very consistently and was now well overdue for a complete strip, clean and reseal.

Terracotta Tiled Floor Before Cleaning in Andover

Cleaning Terracotta Tile

To get the floor clean and remove previous sealers and coatings I mixed a strong solution of Tile Doctor Pro-Clean with NanoTech UltraClean which basically adds tiny abrasive particles to a heavy duty alkaline cleaning agent to produce a very effective stripper/cleaner which being alkaline is ideal for cleaning natural products such as Terracotta.

This formula was scrubbed into the tile using a black scrubbing pad fitted to a rotary machine running on a slow speed which helps to reduce splashing; this activity soon brought the dirt off the floor and the soiled cleaning solution was removed using a wet vacuum and the floor was rinsed down with clean water. The cleaning process was repeated a couple of times until we were happy with the floor, a stiff hand brush was then used along the grout lines with more Pro-Clean to clean up the grout. There were a few stubborn paint splashes on the floor and these were removed by spotting the affected area with Remove and Go and a steamer to lift the stain out of the clay.
Once happy the floor was clean it was given a thorough rinse to neutralise it and remove any remaining chemical and left it to dry overnight.

Terracotta Tiled Floor Before Cleaning in Andover

Sealing Terracotta Tile

The next day we came back to seal the Terracotta using numerous coats of Tile Doctor Seal and Go which is an ideal sealer for Terracotta and provides durable stain protection together with a low sheen finish. Terracotta is by its nature very porous and so it’s not unknown for it to take up to nine coats of sealer, which can take some time to apply as like paint you have to wait until it’s dry before you can apply the next coat.

Terracotta Tiled Floor After Cleaning in Andover
 

Terracotta Floor Cleaned and Sealed in Hampshire

Terracotta Tiled Floor Cleaned and Sealed in Andover, Hampshire Read More »

Fareham Terracotta Floor Finished

Terracotta Tiled Floor Maintained in Fareham, Hampshire

This Terracotta tiled floor was installed in the kitchen of a house in Fareham. The floor was in need of a deep clean especially in the high traffic areas where the sealer had worn down and on the tiles near the kitchen units there were some stubborn stains from spillages.

Fareham Terracotta Floor Before

Cleaning Terracotta Tile

I started the job using a solution of Tile Doctor Pro-Clean, which is a heavy duty alkaline product ideal for cleaning natural products such as Terracotta, this was scrubbed in with a black pad fitted to a rotary machine. The cleaning process was repeated a couple of times and a stiff hand brush was used along the grout lines to clean up the grout. To treat the suborn stains we mixed Pro-Clean 50/50 with Tile Doctor NanoTech UltraClean which adds tiny abrasive particles to the cleaner making it even more effective; its best to leave the resultant solution to soak into the tile for half an hour before working it in with a scrubbing brush. Once happy the floor was clean it was given a thorough rinse to remove any remaining chemical and left it to dry overnight.

Fareham Terracotta Floor During

Sealing Terracotta Tile

The next day came back to seal the Terracotta but first checked the floor for any spots we might had missed and also to ensure it had dried sufficiently. Tile Doctor Seal and Go was used to seal the floor, it’s a water based sealer so it doesn’t give off an odour when it’s drying and also offers durable stain protection together with a low sheen finish. Terracotta is very porous and in the end the floor actually took seven coats of sealant before it was fully sealed. Applying a sealer does takes a long time to apply as you have to wait for it to dry before applying the next coat.

Fareham Terracotta Floor Finished
The work took two days in all and you can see the difference for yourself, the Terracotta tile and grout look wonderful and have lifted the overall look of the Kitchen.

Terracotta Floor Cleaned and Sealed in Fareham

Terracotta Tiled Floor Maintained in Fareham, Hampshire Read More »

Southampton Grout Recolour Before and After

Grout Colouring in Southampton

This Porcelain Terracotta floor had dark grout and the home owner wanted the colour changing to lighten the floor. There are a number of products on the market for this purpose including grout colour pens which are ok for a quick touch up but for a large area like this you really need to use the range recommend by Tile Doctor which not only change the colour but also provides a protective barrier that seals the grout as well ensuring it keeps it appearance well into the future.

Southampton Grout Recolour Before

Preparing the Grout

Before applying a Grout Colour it’s important to ensure the grout is clean of grease and dirt; Tile Doctor Pro-Clean is a strong alkaline cleaner that’s good for this purpose, for best results you should allow the cleaner to dwell for a while and then get into the grout joints by hand with a stiff brush. Last step is to rinse the floor down with clean water to remove any remaining cleaning product, I recommend the use of a wet vacuum at this point to remove liquids from the floor.

Southampton Grout Recolour Before Southampton Grout Recolour After

Applying the Grout Colour

Once the grout has dried you can start applying the colourant which is a relatively straightforward process of squeezing the product onto a toothbrush and running it onto the grout. Don’t be tempted to use an old toothbrush for this purpose as it may contaminate the colourant leading to discolouration in the finish. The product sets in a couple of hours so I was able to do the whole floor in a day.

Southampton Grout Recolour After
 

Colouring Grout in Hampshire

Grout Colouring in Southampton Read More »

=================================

Hampshire Tile Doctor

================================= Read More »

Scroll to Top